2. We Styling Now B)
So you’ve completed through the first tutorial (or skipped skimmed it because it’s kind of just a run through about html and i figured more people here are actually interested in the css portion) and you wanna get what you REALLY signed up for when you joined this discord. More lectures by yours truly!!!!!!!! Haha. Just kidding :D or am i.
Hopefully by now you have an html page written up with maybe some styles inserted manually in the html element. If you’re like me trying to write up a simple page with only html, this probably got really old really fast especially if you had multiple elements that you wanted to do the same thing to.
Well fortunately, i have the solution to this problem and the cause of 100000000 more problems: CSS
What The Fuck Is A CSS???????
CSS stands for Cascading Style Sheets and they describe how html elements are meant to be displayed (I copied this straight from www.w3schools.com/css/css_intro.asp) (A lot of this tutorial will be paraphrased from that tutorial so I highly recommend just reading the tutorial instead)
Why would we want to learn an entirely new language? The biggest benefit that CSS gives us over just programming everything in the html is that it helps us avoid lots of repetition and reducing repetition actually reduces the complexity as well!
Separating the fancy animation + perspective work in one file allows the html file to be more focused on the actual content without the clutter!
“Now you’ve really convinced me, how do I add CSS to my web page?”
You ask as I put the words into your brain.
Ahhem.
anyways
there are three different ways:
- Inserting it into the html element itself like the example webpage I built in the last tutorial through ATTRIBUTES<div style="color: light blue"> box! </div>
- Between special tags
<style> </style>in the html file - Into it’s own file that ends with
.css
The last method is the most popular as it allows you to separate the style from the content and even reuse the same style sheet across multiple html pages.
For this method, we need to make sure that the html page knows that this file exists and to use the file so we can add the following to the html page in between the <head></head> tags
<link rel=“stylesheet” type=“text/css” href=“hey_a_style.css”>
Don't forget to make hey_a_style.css and also put it in your folder where the rest of these files live!
CSS Files
Good question me! A css file just contains a set of rules for an html document to follow. Each of these rules look like the following:
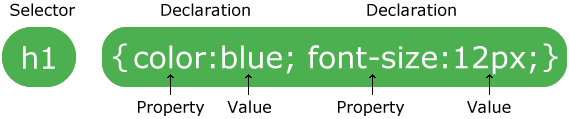
At its core, it contains a (or multiple) selector(s) and a single declaration block.
The selector points to the html element to be styled and the declaration block contains one or more declarations each ending with a semicolon.
Each declaration is a css property name + value separated by a colon.
- Each declaration block is surrounded by curly braces. And a css file can contain hundreds or thousands of these declaration blocks
Note that the curly braces, semicolons, and colons are absolutely necessary for the css file to be interpreted correctly! Sometimes if it doesn’t look like your css file is working, double check the syntax.
In the pic linked, this declaration block is selecting all the h1 header tags and making them blue and any font that shows up in that header will be size 12px
A nice consequence is that we don’t have to repeat the same style that we want all elements to have multiple times. If you took a look the html in the codepen from the last tutorial, i copy pasted some of the same styles in multiple places. With CSS, I could just select for that element, for example the td tag, and gave all of them the same style:
Exercise 1
Take the html from the previous exercise and separate all the style elements into a css file. I’ll start the first two ones for you here!
See the Pen XWJqxBr by Lisa (@pomelope)
solution: https://codepen.io/pomelope/pen/PoYXXVV
If you looked at the example I provided in the previous exercise, you might have noticed that there are two lines that we can't quite take out and put into the css file without causing everything to look different. They share the same element name, but we want to style them differently!
This is where two special types of selectors and two new attributes come into play! class and id. These are how you create custom selectors to target a subset of the elements.
CLASSES
;ALSKDJFLDFJFJ YOU CAN THINK OF THIS AS THE HOMESTUCK CLASS OR ASPECT WHERE A GROUP OF PEOPLE CAN FALL UNDER CLASSES OR ASPECTS WITH THE SAME NAME AND THE CLASS/ASPECT DESCRIBES A PERSON AND MULTIPLE PEOPLE CAN BE DESCRIBED WITH THE SAME CLASS
to create a class, we indicate to the computer that something is a class by having a period . followed up by your name for a class for example if we had a class name text-box we could style it in the following manner:
then, in the html, you would specify the class like so:
<div class="text-box"> CG:ATTENTION WORTHLESS HUMAN </div>
now all divs that have class text-box will be monospaced with a greyish background color and a dotted border
take a look at the difference here between a div with a class and a div without a class:
See the Pen class_ex_1 by Lisa (@pomelope) on CodePen.
We can also give the same html element multiple classes! I'm going to add the class karkat and john to the css
See the Pen class_ex_2 by Lisa (@pomelope) on CodePen.
IDs
Ids are another way of specifying elements. instead of a period, it is prepended with a hashtag #. Ideally each id is only used once per html document... I've changed john from a class to an id. Technically I can't change karkat because it appears more than once. :person_shrugging: (but you can do it. i did not choose the best example for using ids).
<div id="egbert"> EB: hi karkat!</div>
See the Pen class_ex_3 by Lisa (@pomelope) on CodePen.
(I also moved a few divs around to make it match closer to homestuck)
Some fun things to do with ids is using them to jump around pages! For example, because I have an id set for the top of the id section in the following manner*
<h2 id="IDs">IDs</h2>
I can make a LINK that jumps to it with the following html:
<a href="#IDs">LINK</a>
MORE SIMPLE SELECTORS
| Selector | Example | Example description |
|---|---|---|
.class |
.intro |
Selects all elements with class="intro" |
#id |
#firstname |
Selects the element with id="firstname" |
* |
* |
Selects all elements |
element |
p |
Selects all <p> elements |
element,element,.. |
div, p |
Selects all <div> elements and all <p> elements |
anyway that's the basics of css! For more reading/better tutorials and where I straight up stole some of this info from: https://www.w3schools.com/css/default.asp